
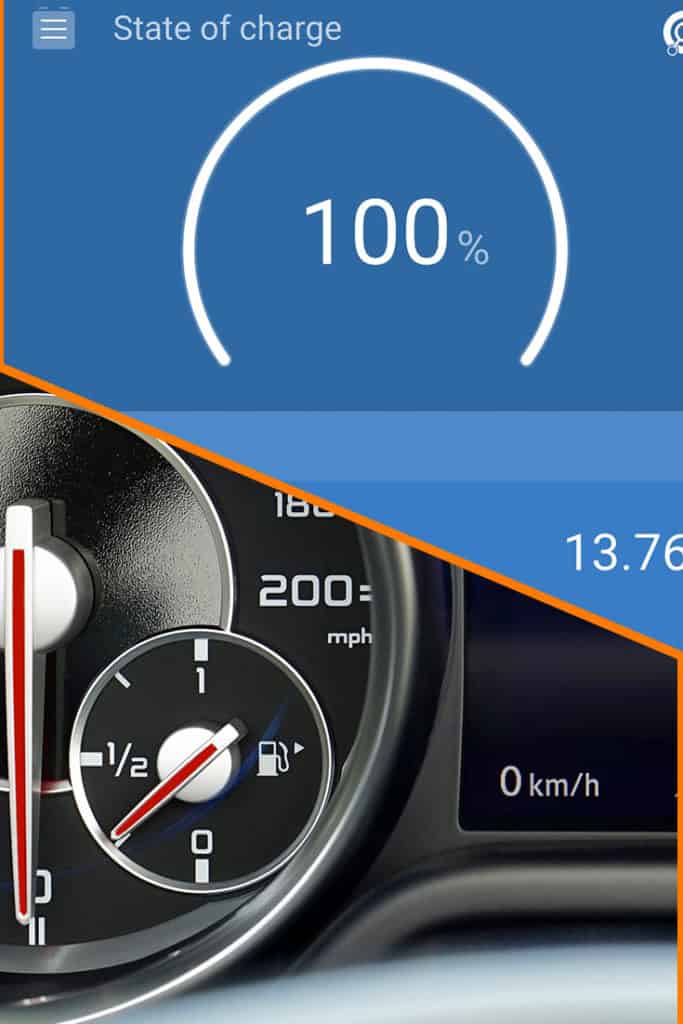
A battery monitor for your house battery bank in your DIY camper van isn’t a necessity, but then again, neither is a fuel gauge for driving. They both serve the same purpose.
Quick note before we get started. This is just one part of an overarching “How to Install a DIY Camper Van Electrical System” series. If you’ve just stumbled on this article directly without seeing that, there are likely some things we’ve already covered. If you want to check out that step by step guide, you can do that here: https://www.explorist.life/diy-campervan-solar
Also, we have interactive solar wiring diagrams that are a complete, A to Z solution for teaching you exactly what parts go where, what size wires to use, fuse size recommendations, wire lug sizes, and all kind of other stuff to help save you time and frustration. You can check that out here: https://www.explorist.life/solarwiringdiagrams/
What does a Camper Van Battery Monitor Do?
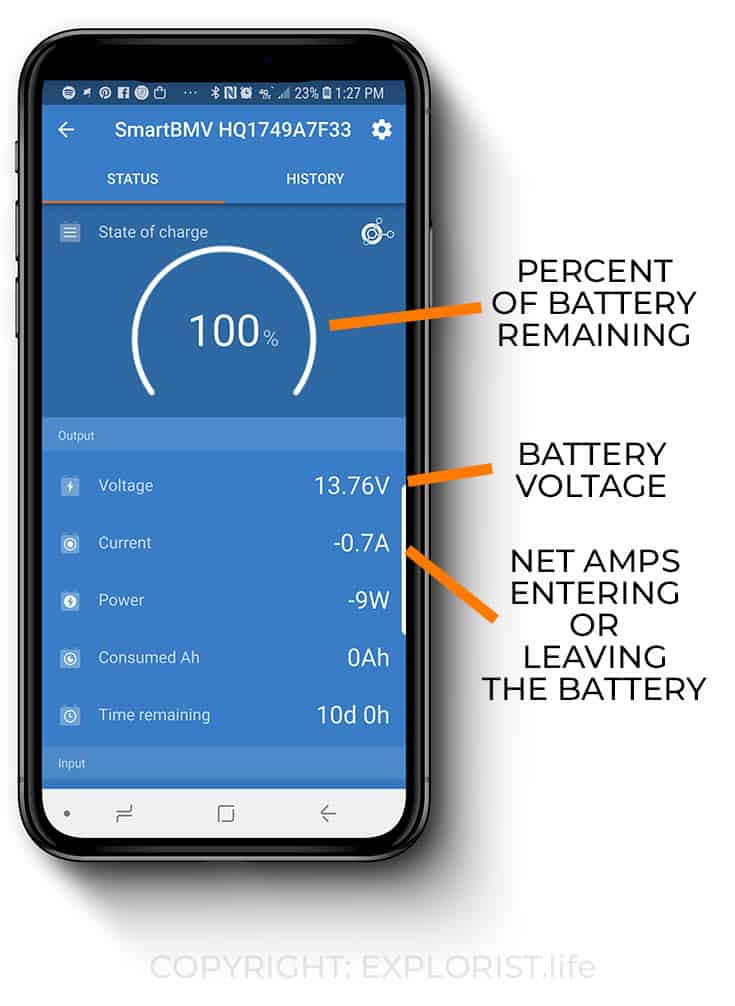
The Battery Monitor, at it’s core, tells you three key pieces of information:
- Net current (amps) that is entering or leaving the batteries
- Percentage of battery remaining
- The voltage of the batteries
How does a Battery Monitor work?
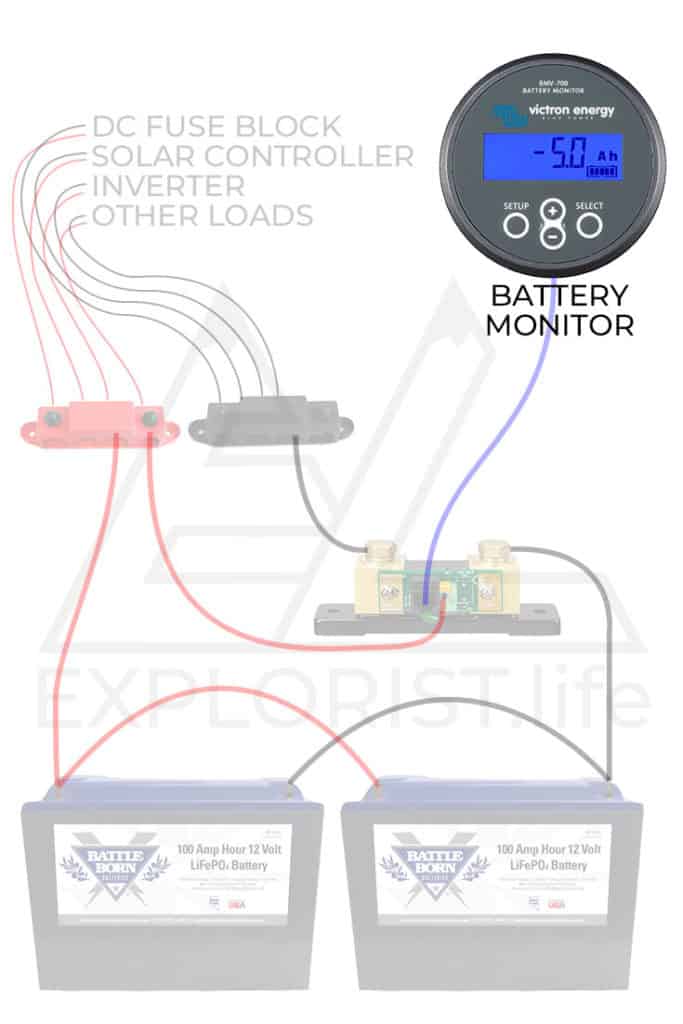
A Battery monitor sits in-line between your batteries and ALL loads of your electrical system.
The battery monitor reads how many amps are going into or leaving your batteries at any given time.
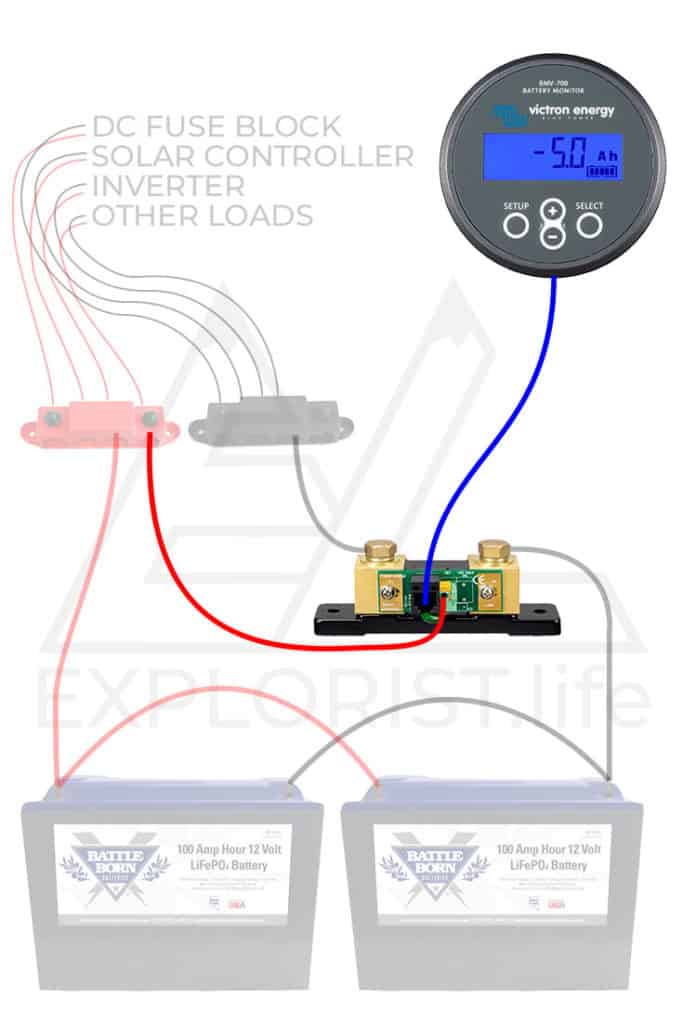
What is a Shunt?
The shunt is the actual measuring device that you will wire in-line your negative cable that goes from your negative battery terminals to your negative busbar. There is usually a little data port to plug in the cable that runs to the actual monitor itself as well as a small power wire that supplies power to the monitor.
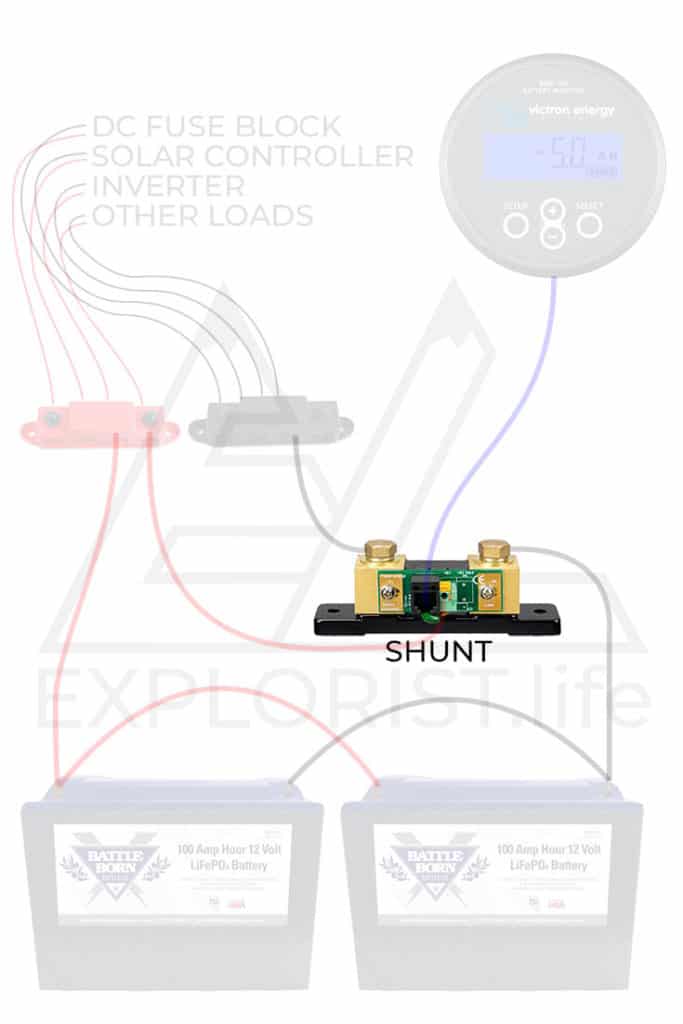
The Battery Monitor
The Battery Monitor is the actual little display face device that you plug into the shunt. If the shunt is the computer, the monitor is, well… the monitor.
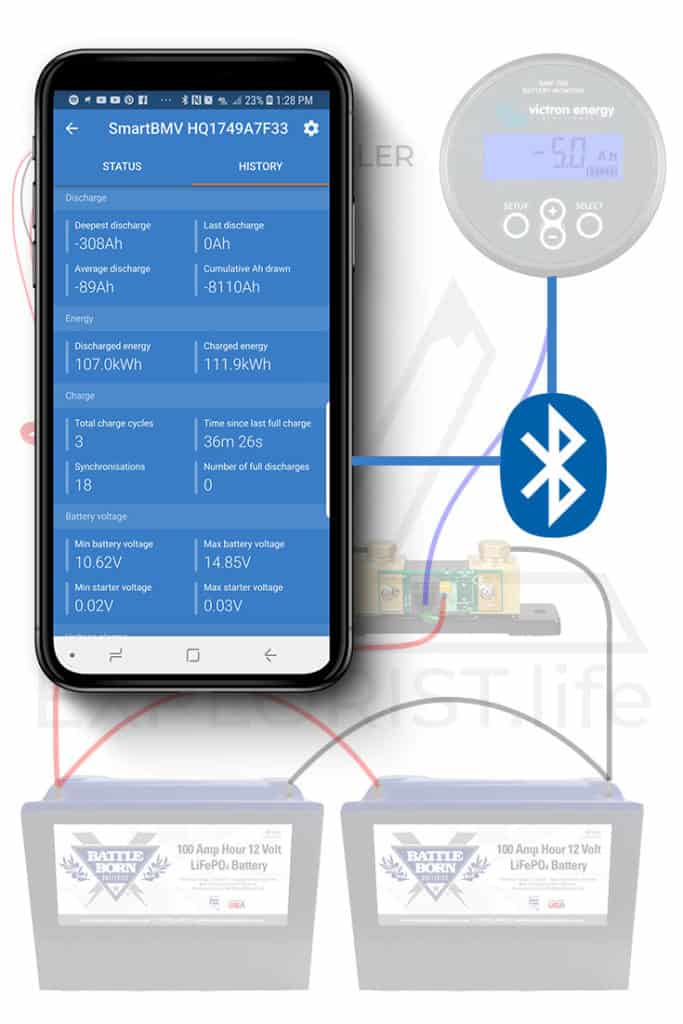
Bluetooth Battery Monitor
The Victron BMV-712, in particular, actually has
The user experience of the Victron Connect app is a highly welcome addition to a high-end camper van electrical system as it has
Now that you know how to wire a battery monitor into your system to keep tabs on your battery capacity, it’s time to actually use that battery capacity for something useful. In the next lesson, you’ll learn how to wire 12v accessories like plugs and fans. Check that out here: https://www.explorist.life/how-to-wire-12v-plugs-fans-and-accessories-in-a-diy-camper/
Everything that you are learning here is put to use in our FREE Interactive Solar Wiring Diagrams. If you haven’t yet, check them out as they are a complete solution for a camper van electrical system. Check them out here: https://www.explorist.life/solarwiringdiagrams/
Remember, this is just one part of a full camper van electrical educational series. To see all of the individual guides, click here: https://www.explorist.life/diy-campervan-solar
Finally, If you found this guide helpful, It’d truly mean the world to us if you’d share it with somebody who can use it, pin it to pinterest for later reference, or share it to a facebook group when somebody has a question about this subject. Click the bubble in the lower right corner to subscribe to be notified of future updates and as always, leave any questions you’ve got in the comments below.

22 Responses
Nate, great content you provide! I purchased the Hi-Res pdf of the 3000w INVERTER | 400-600Ah | 400 TO 1200W SOLAR -CAMPER SOLAR KIT. I’m at the point of installing components, and need to double check the orientation of the BMV-712 shunt. The purchased image makes it appear that the RJ12 side of the shunt is towards Lynx, and the B1/B2 pins are towards the battery. However, your videos appear to have it the other way around, and that would be more consistent with the labeling of the component. Thanks in advance if you could clear that up for me!
It says directly on the shunt which way it goes. Battery goes to the batteries, loads & chargers go to the lynx distributor. They’ve changed the physical orientation of the shunt a few times, so just go with whatever it says on the side of the shunt.
Your thoughts on the Cerbo GX and the GX Touch 50 Screen option? Is it worth the money or is there other options for Internet monitoring of my system?
If you need internet monitoring, the Cerbo GX and GX Touch 50 are great options.
Nate, Which side of the shunt should I ground my batteries from?
The battery bank goes to the “Battery” side of the shunt. LITERALLY EVERYTHING ELSE goes to the ‘Load’ side of the shunt, including the ground. Example: https://www.explorist.life/3000w-inverter-400-600ah-400-to-1200w-solar-camper-solar-kit
Hi Guys
If I use the smart shunt in a dual battery 12v system with a smart solenoid to separate the batteries when camping. Will the smart shunt affect the separation of the batteries when both are monitored? ie will it discharge my starter battery when I’m consuming from the aux battery as both are connected to the shunt monitor terminals?
Kind regards
I’m not fully grasping your question, but all of the systems found at explorist.life/solarwiringdiagrams are dual battery systems. You should check these out and see how they play together.
Hi Nick – I hope all is well. Quick question. What is your thoughts on the Victron Lynx Shunt VE in lieu of using the Victron BMV-712? Do you have any resources that shows this set up wired and used with rest of the Victron products?
The Lynx shunt is great but… it MUST be used in conjunction with a Victron GX device (Like the Cerbo GX) in order to actually view the data. So, by the time it’s all said and done with; using the Lynx Shunt over the BMV-712 is about $400-$500 more expensive to accomplish roughly the same thing. I don’t have any resources at this time covering usage of the Lynx Shunt.
I replaced my camper van battery with a battle born 100 amp lithium battery & now my micro mini monitor battery reads full at all times. Checked with battle born & they informed me the monitor is not geared for lithiumbattery & should use Victron monitor. My question is can I disconnect the existing lead that goes to the battery monitor indicator & connect that to the Victron monitor.
I’m not sure how the “micro mini monitor” works, but if you check out the diagrams I’ve got, you can see where the shunt from the Victron battery monitor needs to be installed: https://www.explorist.life/3000w-inverter-400-600ah-400-to-1200w-solar-camper-solar-kit
Hi Nate, your tutorials and spreadsheet and diagrams and instructions are absolutely amazing! I am getting ready to wire a 1958 Mercury Canned Ham Camper and turn it into a mobile bar so this information is perfect for me. A question about the Victron battery manager and Bluetooth app: how far away can I be from the battery manager for my phone to read the battery level? I’m planning to drop my mobile bar off at events (I’m not doing the bartending myself) and go chill off-site during the event. Will I be able to keep an eye on the battery power from several miles away? Thanks! Kelli
Hey Kelli! That sounds like a super cool project. The Victron devices like the BMV-712 Battery Monitor and the Victron SmartSolar MPPT Charge controller are able to be monitored by bluetooth. The range is ‘standard bluetooth range’ (20-30ft at best) so that wouldn’t work natively…BUT… If those devices were wired to a device called a Victron Cerbo GX and connected to a cellular network (like a 4g hotspot) you could monitor the system from anywhere in the world via the Victron VRM Portal in addition to the short range Bluetooth.
Could I use a bluetooth battery monitor with a goal zero yeti? Would I just wire it up in the same way? It’d be handy having info and history on my phone.
Thank you so much for such high quality tutorials. The electronics seemed pretty daunting until I discovered your info.
You’d have to take apart your goal zero unit to access the proper wires to install the shunt. So, basically, no… It could be done, but not easily.
The shunt I got with the BMV 712 Smart has 2 small red wires with fuses in line and 2 ports on the shunt for these 2 wires. I see one of the wires should be going + bar. Is the wire going to the + bar the port on the right or left looking at it. And is the other one not being used? I have used your diagram for my complete setup. I would like to give you a couple hundred $ for the info. How do I do that. You can contact me at my email with that info. Thanks a lot. No way could I ever have done it without your plans.
The wire from the positive busbar to the shunt will go into ‘B1’, which I’m 95% sure it’s the one on the left, but check the installation manual to verify. The other one, basically, isn’t used. The 2nd port, ‘B2’, is for measuring either midpoint voltage or starter battery voltage. If you WANT to use those (either now, or eventually) feel free; but they are totally not required.
Hi Nate, I see in your diagrams, you are using a negative bus bar.
How about skipping the bar and bolting all the negative lugs on the load side of the shunt? So it acts like.. a negative bus bar.
Cheers.
Sure. It has a tendency to get messy though.
Your timing on writing this extremely helpful and detailed series is awesome! Not only am I in the midst of collecting my components for my solar install on my “TakeMeHome ” tiny house, but I am scheduled to be a speaker at the upcoming St. Pete Tiny Home Show in Florida on March 23, 2019. During my presentation on DIY Tiny House builds, I print up a hand-out to distribute to my audience. Your DIY-Campervan-Solar page is going at the top of my helpful tips flyer! Thanks so much for your awesome posts! My audience will thank you too!
Awesome! Thanks for the plug! 🙂