This blog post is going to show you step-by-step how to install solar, lithium batteries, an inverter, and all of the wiring on a ground up renovation of a 1976 Airstream Argosy. This camper is a project of Andy Rawls, an incredibly talented woodworker and YouTuber out of the Hill Country in Texas.
This is an in-progress project and this blog post will change and evolve as the project nears completion and will change based on ‘things we could have done better’ after the project is complete. The goal of this blog post and all of the wiring diagrams within are going to be a ‘here’s what we should have done’ and not necessarily ‘here is what we did’. So if something in this blog post seems ‘off’ compared to the videos found on this page; it’s because I’ve found a better way or better/newer parts have come on the market.
Click Here to Expand the Changes made to this blog post:
August 7, Blog Post Published.
Airstream Solar Wiring Diagram
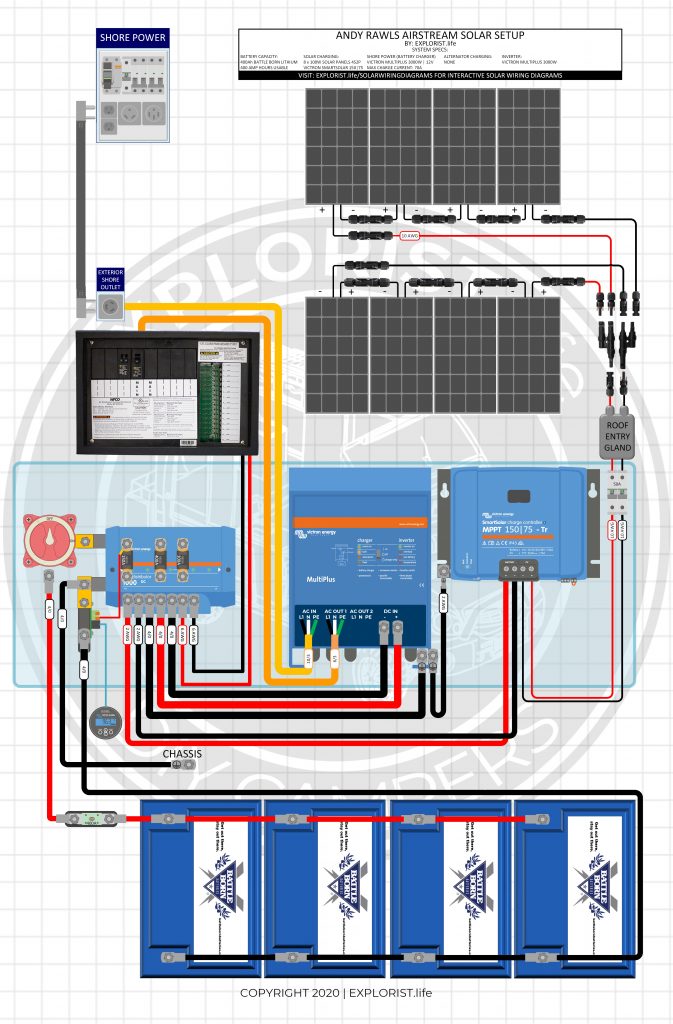
The core of this Airstream electrical install will revolve around 400Ah of Battle Born Lithium Batteries, a 3000W Victron Multiplus Inverter/Charger, and 800w of Solar. The system will be able to charge via solar at a rate of approximately 66 amps under peak conditions or from 120V 30A shore power/generator providing up to 70 amps (at 12V). Andy DOES, indeed, plan on using his air conditioner but understands the system limitations mean that if extended air conditioner usage is wanted, shore power or a gas generator will be necessary.
Airstream Solar Wiring Shopping List
This shopping list is the comprehensive list of all parts used in this build. It includes all components, wires, lugs, heat shrink, etc. The only thing that is missing is small items like wood screws, zip ties, and such that you will likely have laying around if you are DIYing a project like this.
For the ‘Quantities’ in the below shopping list, each singular component is listed a quanty per each, wire is listed a quantity of feet, and heat shrink is listed as qty 1 = 2.25″.
For Example:
Qty 1 – Inverter Charger means you need to purchase 1 Inverter Charger
Qty 3 – 4/0 Wire means you need 3 feet of 4/0 wire. This may mean you need to buy 5ft from the product page
Qty 5 heat shrink means you need 5 pieces of 2.25″ heat shrink. This means you’ll need 5 x 2.25″ pieces of heat shrink for a total of 11.25″ of heat shrink.
| Product | Qty | Link |
|---|---|---|
| 1/2" Black Heat Shrink | 8 | |
| 1/2" Red Heat Shrink | 2 | |
| 1/4" Black Heat Shrink | 9 | |
| 1/4" Red Heat Shrink | 3 | |
| 10 AWG Black Wire | 50 | |
| 10 AWG Ferrule | 12 | |
| 10 AWG Red Wire | 50 | |
| 10 AWG Triplex Wire | 10 | |
| 100 Amp MEGA Fuse | 1 | |
| 100Ah Battle Born Lithium Batteries | 4 | |
| 100w NewPowa Solar Panels | 4 | |
| 150 Amp MEGA Fuse | 1 | |
| 2 AWG Black Wire | 4 | |
| 2 AWG Ferrule | 2 | |
| 2 AWG Red Wire | 2 | |
| 2 AWG x 1/4" Wire Lug | 1 | |
| 2 AWG x 5/16" Wire Lug | 3 | |
| 2-to-1 MC4 Combiner | 1 | |
| 3/4" Black Heat Shrink | 18 | |
| 3/4" Red Heat Shrink | 14 | |
| 30A Shore Power Cord | 1 | |
| 30A Shore Power Inlet | 1 | |
| 4/0 Black Wire | 25 | |
| 4/0 Red Wire | 15 | |
| 4/0 x 3/8" Wire Lug | 2 | |
| 4/0 x 5/16" Wire Lug | 24 | |
| 400 Amp ANL Fuse | 1 | |
| 400 Amp MEGA Fuse | 1 | |
| 50A Square D HOM AC Breaker | 1 | |
| 6 AWG Black Wire | 10 | |
| 6 AWG Ferrule | 8 | |
| 6 AWG Red Wire | 10 | |
| 6 AWG Triplex Wire | 10 | |
| 6 AWG x 5/16" Wire Lug | 2 | |
| Din Rail Breaker Box | 1 | |
| Heavy Duty ANL Fuse Holder | 1 | |
| Lynx Adapter | 2 | |
| Lynx Distributor | 1 | |
| Master Disconnect | 1 | |
| MC4 Connectors | 6 | |
| MultiPlus 12/3000/120-50 120V VE.Bus | 1 | |
| Roof Entry Gland | 1 | |
| Solar Disconnect Breaker | 1 | |
| Victron BMV-712 Battery Monitor | 1 | |
| Victron SmartSolar MPPT 150|70 | 1 | |
| Victron VE.Bus Smart Dongle | 1 | |
| WFCO AC-DC Distribution Panel | 1 |
Airstream Solar Wiring Parts List
This list is the detailed breakdown of each of the items from the shopping list above that shows you where, in the system, each part actually goes. If you are purchasing parts to mirror this system, buying the parts from the consolidated list above is the most accurate way to get correct quantities.
| Column A | Column B | Column C | ||
|---|---|---|---|---|
Battery Bank Wiring | ||||
| This section contains all of the parts necessary to wire the battery bank together. These products include the batteries as well as the related wiring parts that you will need to make the battery to battery connections. | ||||
| Product | Qty | Link | ||
| 100Ah Battle Born Lithium Batteries | 4 | |||
| 4/0 Red Wire | 5 | |||
| 4/0 Black Wire | 5 | |||
| 4/0 x 5/16" Wire Lug | 12 | |||
| 3/4" Red Heat Shrink | 6 | |||
| 3/4" Black Heat Shrink | 6 | |||
Battery Bank to Busbars | ||||
| This section contains all of the parts necessary to wire the battery bank to the Lynx Distributor. The Lynx Distributor itself as well as the shunt for the battery monitor and fuse mounted to the Lynx Distributor protecting the positive wire from overcurrent can be found in this section. The Lynx Distributor is essentially an extension of the battery terminals and allows you to deliver power where it needs to go and houses the fuses necessary to protect the wires leaving the Lynx Distributor. The Battery monitor allows you to know how full your batteries are, know how much power you are actively gaining or losing, and see the historical data of your power usage. | ||||
| Product | Qty | Link | ||
| Lynx Distributor | 1 | |||
| Victron BMV-712 Battery Monitor | 1 | |||
| 4/0 Red Wire | 5 | |||
| 4/0 Black Wire | 5 | |||
| 4/0 x 5/16" Wire Lug | 4 | |||
| 4/0 x 3/8" Wire Lug | 2 | |||
| 3/4" Red Heat Shrink | 4 | |||
| 3/4" Black Heat Shrink | 2 | |||
| 400 Amp ANL Fuse | 1 | |||
| Heavy Duty ANL Fuse Holder | 1 | |||
| Lynx Adapter | 2 | |||
| Master Disconnect | 1 | |||
Busbar to Inverter/Charger | ||||
| This section contains the Inverter Charger and all of the parts necessary to wire the Inverter Charger to the Positive and Negative busbars. The Inverter Charger allows you to re-charge your batteries from 'shore power' and also converts the 12v DC power stored in your batteries to 120V AC power like you'd find in your standard household wall outlet. | ||||
| Product | Qty | Link | ||
| MultiPlus 12/3000/120-50 120V VE.Bus | 1 | |||
| 4/0 Red Wire | 5 | |||
| 4/0 Black Wire | 5 | |||
| 4/0 Black Wire | 5 | |||
| 4/0 x 5/16" Wire Lug | 6 | |||
| 3/4" Red Heat Shrink | 2 | |||
| 3/4" Black Heat Shrink | 4 | |||
| 400 Amp MEGA Fuse | 1 | |||
| Victron VE.Bus Smart Dongle | 1 | |||
| This section contains all of the parts necessary to wire 8x100w solar panels into your camper electrical system. This solar array is managed by the Victron SmartSolar MPPT 150|70 and remaining products include the wires, solar disconnect breaker, solar disconnect breaker box, lugs, ferrules, heat shrink and everything else needed to make the full solar panel array to busbar assembly. This parts list does not include means to attach the solar panels to the roof as that veries GREATLY from install to install. | ||||
| Product | Qty | Link | ||
| 100w NewPowa Solar Panels | 4 | |||
| Victron SmartSolar MPPT 150|70 | 1 | |||
| 10 AWG Red Wire | 50 | |||
| 10 AWG Black Wire | 50 | |||
| MC4 Connectors | 6 | |||
| 2-to-1 MC4 Combiner | 1 | |||
| Roof Entry Gland | 1 | |||
| Solar Disconnect Breaker | 1 | |||
| Din Rail Breaker Box | 1 | |||
| 10 AWG Ferrule | 6 | |||
| 2 AWG Ferrule | 2 | |||
| 2 AWG Red Wire | 2 | |||
| 2 AWG Black Wire | 4 | |||
| 2 AWG x 5/16" Wire Lug | 3 | |||
| 2 AWG x 1/4" Wire Lug | 1 | |||
| 1/4" Red Heat Shrink | 3 | |||
| 1/4" Black Heat Shrink | 3 | |||
| 3/4" Red Heat Shrink | 2 | |||
| 3/4" Black Heat Shrink | 4 | |||
| 150 Amp MEGA Fuse | 1 | |||
Busbar to DC Fuse Block | ||||
| This section contains the DC fuse block (which is inside of the AC-DC distribution panel) as well as the wires to connect it to the main DC distribution busbars. This will allow you to deliver power to the DC Fuse block for small branch circuits such as lights, fans, usb outlets, etc.. | ||||
| Product | Qty | Link | ||
| WFCO AC-DC Distribution Panel | 1 | |||
| 6 AWG Red Wire | 10 | |||
| 6 AWG Black Wire | 10 | |||
| 6 AWG x 5/16" Wire Lug | 2 | |||
| 6 AWG Ferrule | 2 | |||
| 1/2" Red Heat Shrink | 2 | |||
| 1/2" Black Heat Shrink | 2 | |||
| 100 Amp MEGA Fuse | 1 | |||
Busbar to Chassis Ground | ||||
| This section includes the parts necessary to allow you to ground your negative busbar to the chassis ground. The chassis ground will be connected to the negative busbar on one side and the other side can go to a factory chassis ground or simply anywhere good metal to metal contact can be made between the wire lug and the bare metal of the body or frame of the camper. | ||||
| Product | Qty | Link | ||
| 4/0 Black Wire | 5 | |||
| 4/0 x 5/16" Wire Lug | 2 | |||
| 3/4" Black Heat Shrink | 2 | |||
Shore Power to Inverter/Charger | ||||
| This section includes the exterior shore power outlet and shore power cord that allows you to plug your camper into shore power as well as all of the wiring that allows you to connect the exterior shore power cord to your inverter charger. This will allow you to not only use shore power for powering your devices but also allow you to charge your batteries from shore power. Note: 10/3 w/ ground wire you will find at your local hardware store will very likely have 4 wires in it, which is unnecessary. The link for 10 AWG Triplex Wire below has 3 wires inside, which is correct for the application. | ||||
| Product | Qty | Link | ||
| 30A Shore Power Inlet | 1 | |||
| 10 AWG Triplex Wire | 10 | |||
| 10 AWG Ferrule | 6 | |||
| 1/4" Black Heat Shrink | 6 | |||
| 30A Shore Power Cord | 1 | |||
Inverter Charger to AC Distribution | ||||
| This section includes the wiring necessary to connect the inverter charger to the AC side of the AC-DC power distribution panel listed in an earlier section. A quick note... 6/3 stranded wire is used here because although our shore power is 30A max, which 10 gauge wire is adequate for, the PowerAssist function of the Victron Multiplus Inverter Charger can add up to 3000w of battery power to shore power in the event that more power than the shore power can provide is needed. This much power coming from the Inverter/Charger requires 6 gauge wire feeding a 50A main breaker in the AC distribution panel. Also... the 6/3 w/ ground wire you will find at your local hardware store will very likely have 4 wires in it, which is unnecessary. The link for 6 AWG Triplex Wire below has 3 wires inside, which is correct for the application. | ||||
| Product | Qty | Link | ||
| 6 AWG Triplex Wire | 10 | |||
| 6 AWG Ferrule | 6 | |||
| 1/2" Black Heat Shrink | 6 | |||
| 50A Square D HOM AC Breaker | 1 | |||
Airstream Solar Setup
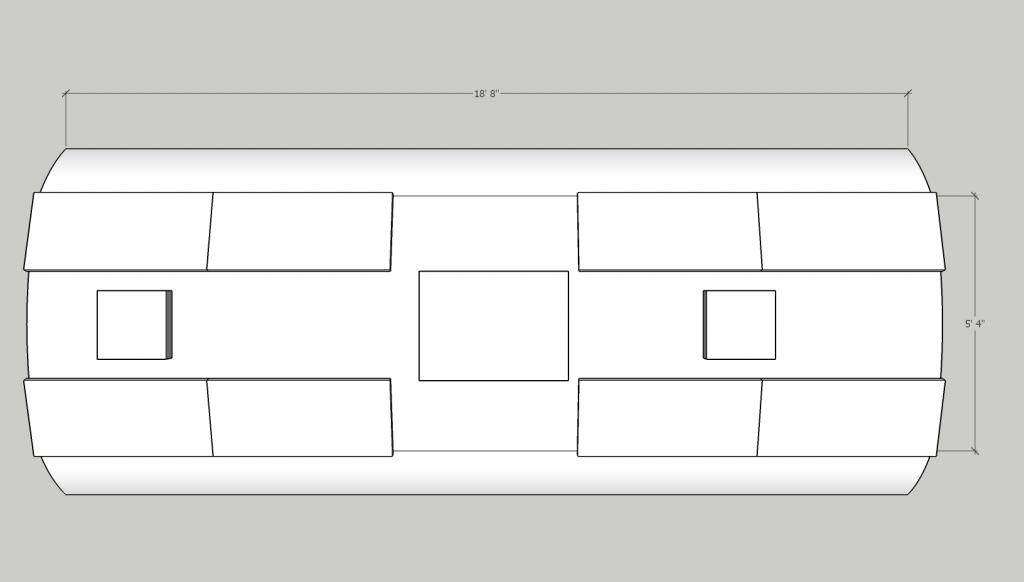
Completely recharging a 400Ah battery bank in a single day generally takes 800w of solar. Andy took some measurements of his roof and sent them over. I got to work in Sketchup making a to-scale model of the roof to determine which panels would fit out needs the best and came out with the following. The three squares in the middle of the roof are a roof vent, air conditioner, and roof vent, respectively. The four rectangles on each of the sides are 100W Newpowa Solar panels measuring 44.49 x 19.88 inches (1130 x 505mm). These panels will be wired in a series parallel configuration and connected to a Victron SmartSolar MPPT 100/75. The wiring method can be seen in the diagram above.
How to Install 12V Lights in a DIY Airstream Renovation
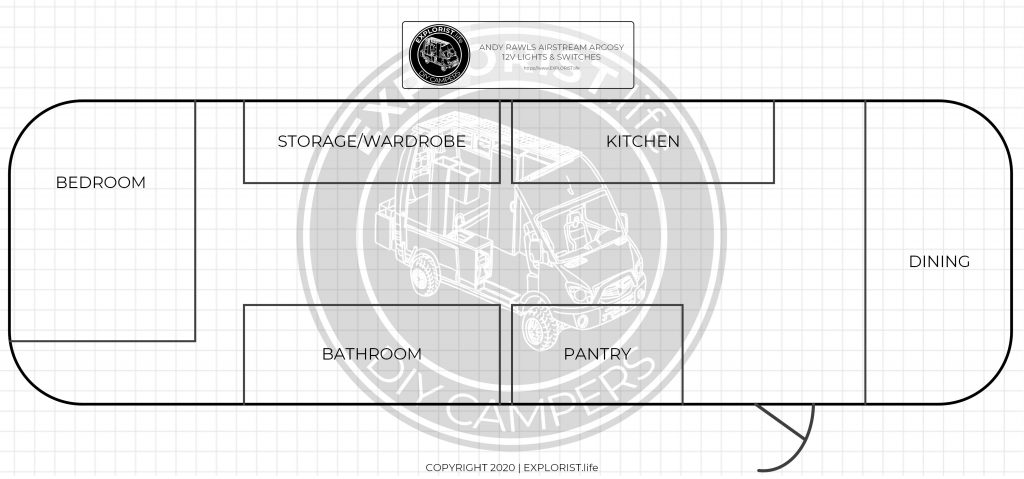
This section of the blog post will map out how Andy ran the lights and switches within his Airstream. Andy provided me with a diagram of where he wanted the lights and I came up with a plan for how to run the wires. There are 8 zones of 12v lights in this airstream broken up over 4 branch circuits:
- Bedroom
- Under Bed Utility
- Sleeping Bunk
- Kitchen
- Living Area
- Bathroom
- Dining
- Outside
Here is a diagram of approximately how his Airstream will be laid out in regards to floorplan:
12V Lights & Switches Wiring Diagram
Here is the diagram that shows how the various lights and switches are wired around the camper:
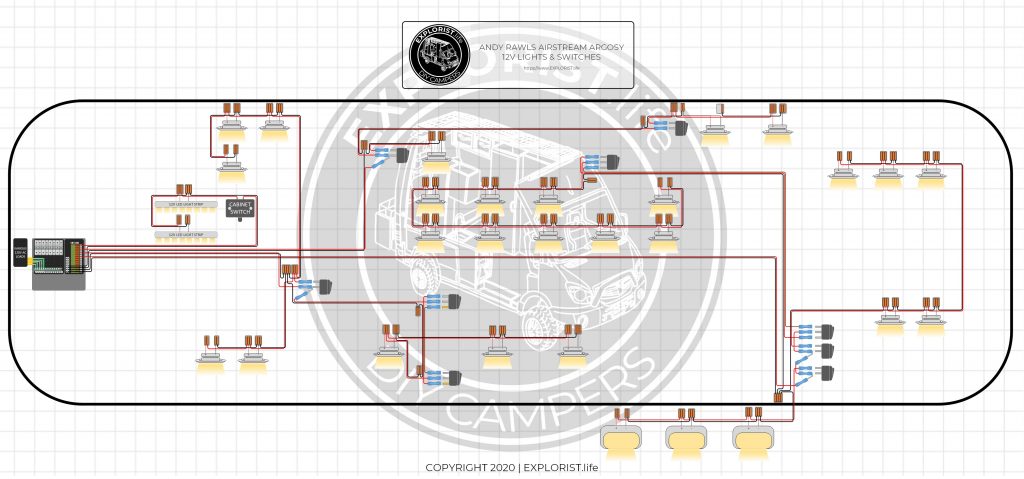
All of the individual rooms have their own zone of lights. These lights are powered by 4 separate circuits coming from the DC fuse box.
The lighting circuit in the middle of the bedroom are simply utility lights underneath the bed that are activated by a cabinet switch that turns the lights on when the bed is raised and turns them off when the bed is lowered.
Airstream 12V Appliances Wiring Diagram:
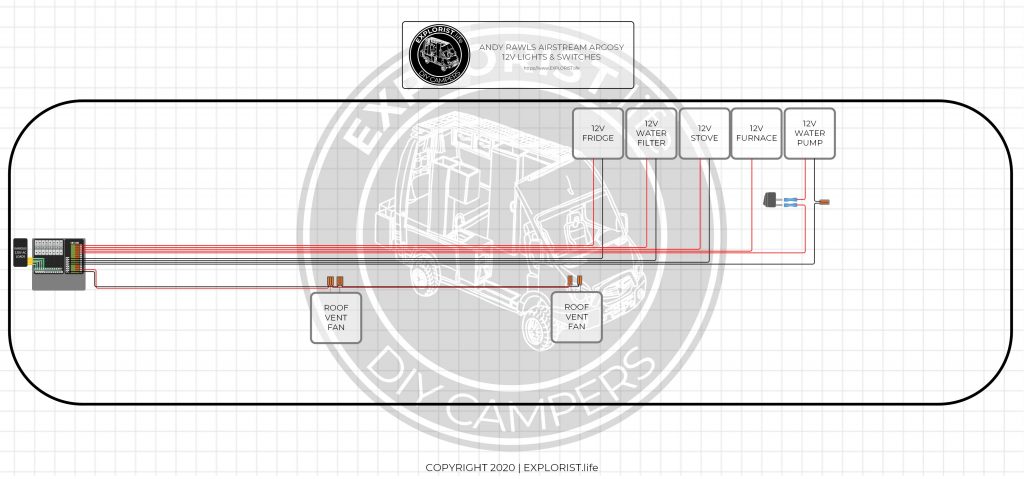
This Airstream has 7 main DC powered appliances:
- Refrigerator/Freezer
- Water Filter
- Stove (Propane w/ 12V ignitor)
- Furnace (Propane w/ 12V ignitor)
- Water Pump
- Roof Vent Fans
Each appliance will have it’s own dedicated circuit with the exception of the roof fans. The roof fans will share a single circuit. The water pump will have a switch in-line to turn the water pump off when not in use or in the event that the water tank runs empty.

49 Responses
Hi Nate,
I’m just about to pick-up a 2016 23FB Airstream. I’m doing the full lithium 400amp battery-victron multi3k charger-inverter modification to the camper. I’m going to move the batteries from the front box under the queen bed. The AC-DC panel is on the opposite side of camper in kitchen. I’m gong to have to run wires under the camper from the inverter back to the panel. It’s about a 15ft run I think. What is the smallest gauge wire I could run from the inverter back to the AC Panel to feed it power? I’m really not going to be running a ton of stuff at once. Do have to use 6/3 or can a go with a bit smaller gauge. I know Victron says 6/3, but wondering if it’s possible to smaller.
Thanks!
It ‘can’ be 10/3 if you use a 30A main breaker in the AC panel. You just won’t get the full capacity of the Victron PowerAssist, which is obviously your judgement call there.
I really appreciate the this post. I noticed that the victron multiplus inverter/charger wasn’t listed in the consolidated list. Is this because it can be replaced with another comprable 3000 watt inverter charger or should I add it to the considated list? Thanks for your time! Also can
This system is indeed set up for the Victron Multiplus 3k Inverter Charger. Somehow it (and a lot of other stuff) got knocked off the list. Should be good to go now.
Hi, Nate. I noticed you used/linked to the Master Disconnect switch by blue seas. It is only rated for 300amps. Is this a problem for a 400 amp hour system?
Nope! Battery capacity doesn’t have any effect on switch size.
so glad to find your channel. I am looking to design a system to power the whole rig. We will be on 50 amp circuit.
Do you have diagram for powering both legs of 50 amp circuit?
Also do you offer consultation work?
Thank you.
Here is a diagram for a 50A Camper Retrofit: https://www.explorist.life/50a-camper-inverter-with-solar-alternator-charging-wiring-diagram/
Here is consulting info: https://community.explorist.life
Do you have a diagram of just putting in a battery bank and inverter? I have 3 battle borne coming a magnum inverter magnum controller and victron battery monitor. (I have a 50amp RV) I will be doing solar later but for right now I need to install these on a budget. And I want to make sure that it will be safe! Thank you I have been watching your channel like crazy since finding it two days ago thanks for all you do.
Here is my diagram for a 50A OEM RV Retrofit: https://www.explorist.life/50a-camper-inverter-with-solar-alternator-charging-wiring-diagram/
You used copper bars for the battery disconnect switch. Where did you get those? I do not see them in the materials list.
They are listed as “Lynx Adapters” in the parts list. Direct link: https://shop.explorist.lifeall-products/victron-lynx-adapter/
Hey Nate-
Thanks for all the help as always. I am trying to find the fuses needed in the Victron Lynx. Do you have a linK? Thanks!
Yeah, they are listed in the parts list on this page.
Hi Nate, thanks for putting together this shopping list. It has made preparing for my upcoming install so much easier. I was also able to snag some of your Victron Lynx Adapters when you had them in stock in early January.
Do you happen to know the torque specs on the Lynx Distributor as you mentioned in the installation YT video? I couldn’t locate the specs online anywhere and the manual was missing from Lynx Distributor when it arrived.
Thanks in advance!
-April
Victron does not specify a torque spec for the Victron Lynx Distributor.
Here is a copy of the manual though: https://www.victronenergy.com/live/dc_distribution
Hi Nate. We live full time in a Rockwood 5th wheel in the UK. 110/12v standard
A UK converts they fit a transformer to supply 240v and 120v. I’m going to purchase one of you diagrams, fitting lithium and a Victron inverter/charger 2000watt. However would a 240 Victron work splitting the power to 240v and power to the transformer or should I fit a 2 Victron or a second inverter?
Thanks in anticipation
Phil Tinker
All should be VERY similar, just get a 12V to 240V inverter instead of the 12V to 120V inverter shown in this project. Unless you are talking about your 5th wheel is wired for 110V and you are trying to charge from 230V 50hz like is common in the UK. Which in that case, would be vastly different.
You mentioned that there was a 4th fuse connection in the distributor for the victron orion, does using that eliminate the need for a 2nd alternator?
That 4th space could be for charging from a 2nd alternator OR the primary alternator via an isolator or a DC DC charger. Example: https://www.explorist.life/3000w-inverter-400-600ah-400-to-1200w-solar-camper-solar-kit
thr busbar in the video
Here is the link to that: https://battlebornbatteries.com/product/victron-lynx-distributor/?afmc=explorist_bb67
Hi, if I have 6 PV 405w each (Vmp)40.5v
open circuit (voc)49.2
(Imp) 10.00A
What size victron regulator MPPT I need
I don’t have enough information from your post to answer your question, but here is how to calculate the proper charge controller for your needs: https://www.youtube.com/watch?v=MxziHKvTRh8
I am using this diagram and parts list for my 1979 Airstream Trade Wind. I am considering using 4-200 watt panels rather than 8-100 watt panels….assuming the wider panels will fit. Is there a downside to this configuration? Price wise, the total cost of the panels seems to be very close. Also, it looks like the same controller would work.
That’s correct and would work just fine. 🙂
Can you explain your choice of the MPPT 150/75 rather than a smaller (and cheaper) controller like the 100/30? Coincidentally, the hot link in this blog post to the controller takes you to the Amazon page for the 100/30.
Sure! the 100/30 is simply too small for 800w of solar. The input voltage would be exceeded and the 800w would be capped at 30 amps when we should see over twice that under ideal conditions. Perhaps rather than explaining it here, I could recommend this video that would teach you how to size a charge controller: https://www.youtube.com/watch?v=MxziHKvTRh8
@Nate Yarbrough,
Yep, that explains it alright! I’d like to tell you that all I needed was the first 37 seconds, but that would be a lie. Ha! My head is only slightly spinning, but in a good way.
The calculator is awesome!!
If the batteries can put out over 12V then what regulates the voltage to 12V for electronics such as a 12V TV or 12V Blue-ray player?
12v appliances work in a ‘range’; so it’s generally a non-issue.
Greetings,
Im curious — the top consolidated list is everything needed but I noticed there were some things under the wire 8x100w solar panels section that were not on the consolidated list that was at the start. did I miss some things? or is that section needed to be added to the list separate?
Thank you so much for making this! excited to dive in and wire everything up. very nervous, but very excited
The stuff in the solar section has to be added to the consolidated list manually as there are several different options for solar setups.
Hey Nate,
I purchased your diagram, very helpful. In the diagram you are using the MPPT 250/100 controller. I only plan on 700 watts of solar. can I get away with swapping the 250/100 out for the 100/50 controller? If so, would I need to make any other changes?
I have SEVERAL different options for solar array wiring at the bottom of this blog post with accompanying charge controller sizes: https://www.explorist.life/3000w-inverter-400-600ah-400-to-1200w-solar-camper-solar-kit
im trying to copy this exactly do you have a one click button for all the wiring and panel mounts? ive already ordered the panels and inverter, charge controller,lynx dis, battery monitor,smart dongle,
I don’t have a 1-click purchase option. But the consolidated “Shopping List” at the top is all of the parts you’ll need.
Nate,
First, love your content and really appreciate your contributions to the RV community. It is second to none.
Second, have a few quick questions related to an install that is similar to the one here.
– I am running two Lion Energy Lithium batteries (105 ah, 150A max current each) and wanted to know whether they are sufficient to to power a 3000W Victron inverter, or do I need more batteries?
– Is 4/0 cable necessary for connecting to the Victron from the battery bank? I have been told elsewhere that 1/0 would work but all of your diagrams have 4/0—my personal opinion is that I would like to error on the side of larger wire as well. Thoughts?
– What is the risk of undersizing a solar charge controller? If it gets cold and my voltage bumps over the max, what are the repercussions?
Sorry for all the questions!
Ken
It is recommended to have a minimum of 400Ah of batteries to feed a 3000w Inverter.
Victron specifically recommends 4/0 wire for use with their 3000w Multiplus Inverter/Charger.
If the charge controller gets too much voltage, it will be damaged.
Your wiring diagram has a 400a in line fuse between the battery positive and the main cutoff switch with a 4 lithium battery bank. I purchased a wiring diagram from you for 6 lithium battery bank and same 400a fuse in the same position. Can you shed light as to why the same amperage fuse is used when the power source has 2 more battery?
Sure! The battery bank capacity has no bearing on fuse size. 3 batteries or 13 batteries would get the same size of fuse if the amount of power to be asked to flow through the wire from the batteries to busbar is the same. Fuse size is determined by the load size.
I am installing a victron 3000 watt inverter in my 2020 Mallard IDM26. I purchased 4 battleborn batteries and I have moved them inside underneath master bed next to the victron multiplus. Is it ok to install a positive busbar towards the front of the trailer and attach original positive 6awg wire along with posit wire from electric tongue jack and run a new 6awg wire to the new battery bank? Thank you guys for the help on this.
I’ve got a few retrofit diagrams at https://www.explorist.life/solarwiringdiagrams that show how to integrate these systems into existing RV’s.
Hi Nate,
As you’ve mentioned, Airstreams typically can have very limited roof space, what would one have to do to add wattage to a system like this? For instance, 800w on the roof available at all times for charging, but also an additional 400watts of ground mounted solar that gets setup upon arrival to your location(to assist Andy’s Air Conditioner)? Would they be wired in series? Parallel? Separate Charge controllers? Personally, I’d love to add a panel on my truck cap and just plug it into the RV upon arrival to eliminate set/up take/down.
Thanks Nate!
If the ground array series-string matches the roof array series strings; the ground array series string can simply be wired in parallel with the other series-strings. If the ground array has different panel sizes/specs, you would need to run this array to a totally seperate charge controller.
What would happen if the solar is producing and a generator is turned on? Could the solar damage the generator?
No damage would occur. The charge controller would adjust/shut off as necessary to allow the generator to charge through the Multiplus Inverter/Charger.
What is your experience regarding the reliability of MC4 connectors installed on the roof of an RV when placed out in the open and not directly under the panels? I have read mixed reports about this? There appears to be some brands of MC4 connectors that are not reliable.
Many solar panels come with pigtails terminated with MC4 connectors and often solar panel manufacturers say it voids the warranty if you cut off the MC4 connector. I have never used MC4 connectors before so I have no experience to judge if they are reliable.
Stäubli MC4 connectors may be the most reliable?
MC4 Connectors are an industry standard way of attaching solar panels together and they are designed for exposure to the weather. This is why I spec MC4 connectors in all of my wiring diagrams and have even made a video on how to wire MC4 connectors.