This blog post is going to give you the step by step instructions on how to install a 2″ Rough Country lift kit on a 2016 Subaru Crosstrek. There is a video accompanying this blog post that is considered a ‘must watch’ as it gives more details than this blog post does. The main purpose of this blog post is the give you some of the nitty-gritty details like socket/wrench sizes and torque specs for the individual bolts that is difficult to convey in video.
This blog post tells you ‘what to do’ and ‘what you need’ and the video shows you ‘how to do it’.
If you have any questions or need clarification on any of this, please leave a question in the comment section at the bottom of this blog post.
Here’s the embedded instructional video that goes along with the this bog post:
Set the parking brake.
Chock the rear tires.
Break the lug nuts on the front of the Crosstrek loose with a 19mm Socket.
Lift the front of the Crosstrek with a floor jack.
Secure the Crosstrek on a pair of jack stands.
Remove the lug nuts with a 19mm Socket.
Remove the wheel and set aside.
Remove the Brake Cable with a 12mm Socket and Wrench
Remove the ABS cable with a pry tool.
Support the lower control arm with a floor jack.
Here is an image of what you should be looking at and the parts labeled for reference on the next steps:
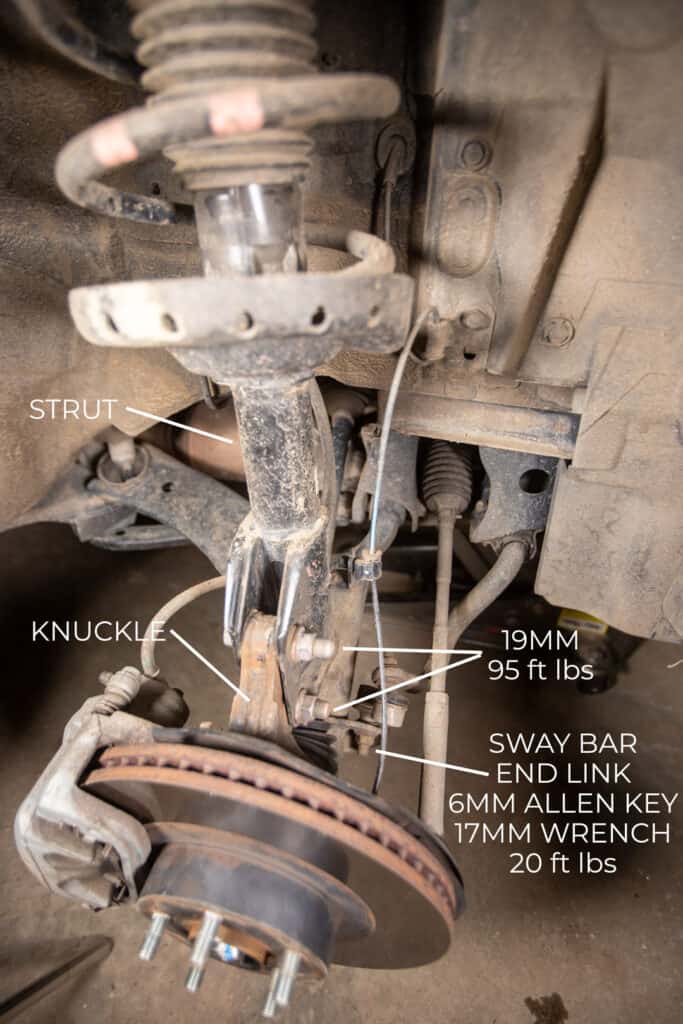
Disconnect the lower sway bar end link from the control arm with a 17mm wrench and 6mm Allen Key.
Make a reference mark on the camber bolt (top bolt that holds the knuckle to the support so you can install this bolt in the exact same place for alignment purposes.
Undo both the top and bottom strut-to-knuckle bolts with a 19mm socket and remove. REMEMBER: There is a specific top and bottom bolt. As you are removing these two, keep in mind which is which. NOTE: There is also a washer on the top bolt.
Support the strut from below and remove the three nuts from the top of the strut, accessed from under the hood. These nuts can be removed with a 12mm socket.
Remove the strut from the car.
Place the strut spacer on top of the strut and secure in place with the same 12mm nuts you just removed from the top of the strut and tighten to 30ft lbs.
Reinstall the strut back in place the same way you removed it. IMPORTANT: There is a notch on the notch on the lower plate of the strut spacer. This notch MUST face toward the FRONT and OUTSIDE of the car.
Fasten the Rough Country supplied nuts to the top of the strut spacer from under the hood. Leave these very loose for now. Simply get the nuts started on the studs to hold the strut in place.
Rotate and push the knuckle back into place and reattach the 19mm hardware in EXACTLY the same orientation it was removed.
Torque ALL of the hardware that you removed in accordance with the following graphic:
Reinstall the wheels and torque the lug nuts to 90ft/lbs.
Repeat this exact same process on the other side.
Remove the jack stands and lower the car and prepare the start on the back end of the car.
Break the lug nuts loose
Lift the rear of the car
Set your jack stands in place.
Remove the lug nuts and wheels.
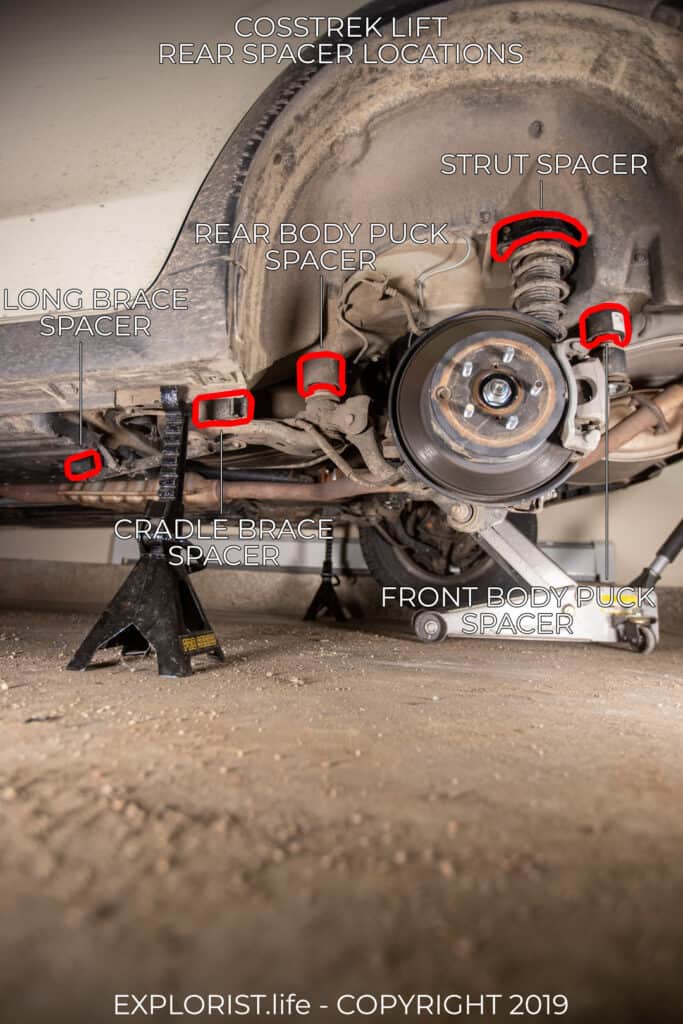
For visual reference, here are the locations at which we will be installing spacers during this next step:
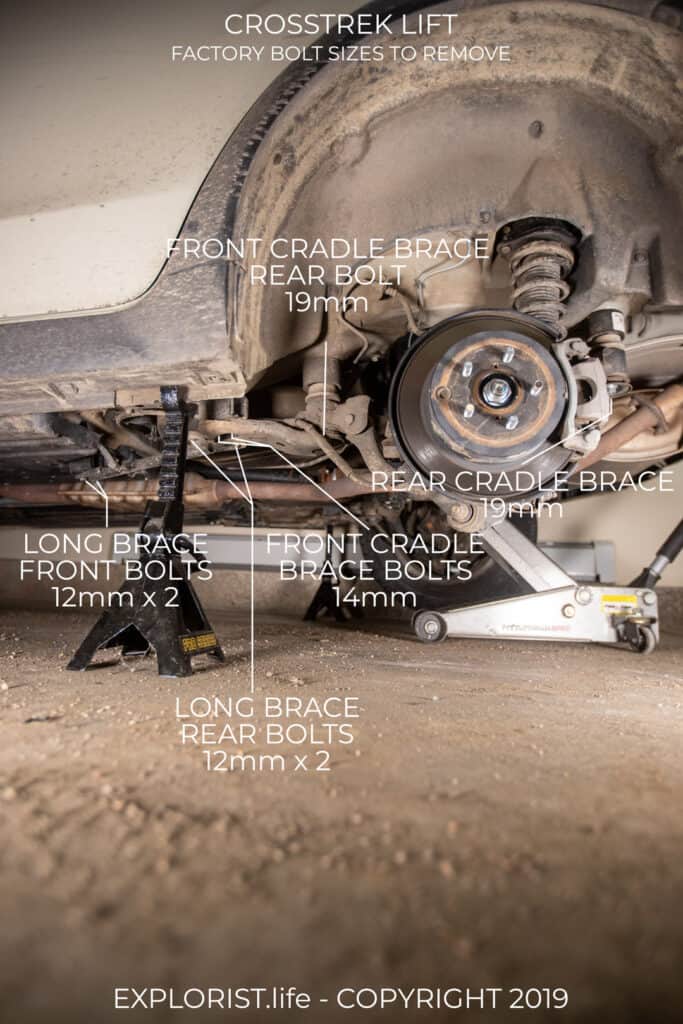
Here is a list of the bolts/nuts and their sizes that will be removed during the next steps:
Note: Some Cosstreks don’t have the ‘long brace’ we are about to talk about. If yours does NOT; there are a different set of instructions for the following section in the Rough Country instructions.
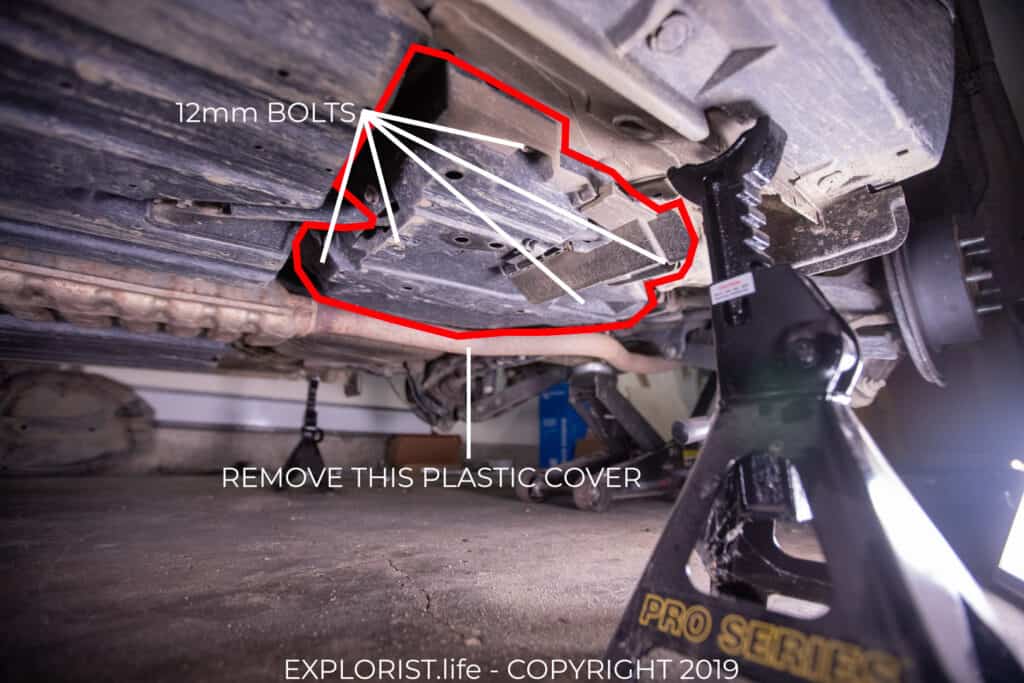
Remove the plastic shield that covers the long brace. There are five bolts to remove in the following locations. Use a 12mm socket to remove these. Do this on both sides:
Remove the long brace using a 12mm socket on each of the 4 long brace bolts. You will be re-using the two rear long brace bolts. Do this on both sides:

It’s important to watch the video for this next section to see how everything comes together, but here is the order of operations.
Remove the front cradle brace front bolts on both sides of the crosstrek with a 14mm socket. You will not be re-using these.
Support the rear suspension with a floor jack under the rear differential.
Working on one side at a time now; break both the front cradle brace rear bolt and the rear cradle brace bolts loose with a 19mm Socket.
Remove the front cradle brace rear bolt with a 19mm Socket. You will not be reusing this bolt.
Loosen the rear cradle brace bolt with a 19mm socket until it is ALMOST removed.
Lower the floor jack until you can place a body puck spacer between the front cradle brace rear bolt bolts and the body.
Install one of the long bolts through this new body spacer and tighten only a half-dozen turns or so.
Remove the rear cradle brace bolt.
Lower the floor jack until you can place a body puck spacer above the rear cradle brace.
Insert the body puck into the space created above the rear cradle brace and insert the Rough Country supplied rear cradle brace bolt but leave loose.
Insert the spacer that goes between the front of the front cradle brace and the body. Insert the Rough Country supplied bolts into this position.
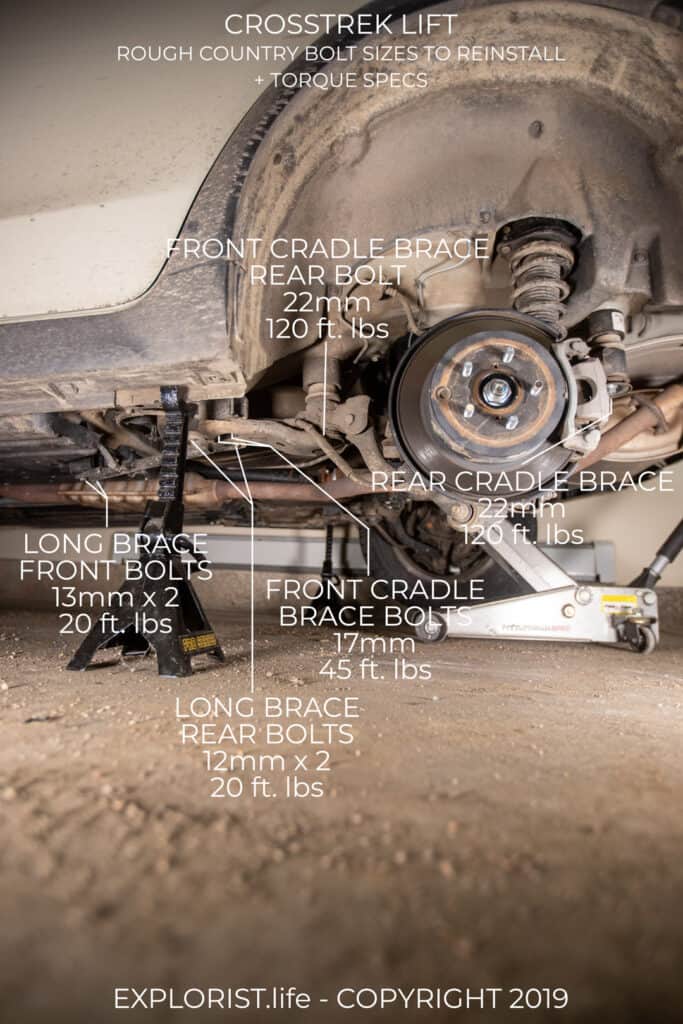
Tighten the rear cradle brace bolt, the front cradle brace rear bolt, and the front cradle brace front bolts and torque according to the following spec:
Reinstall the Long Brace starting with reinstalling the factory-supplied Long Brace rear bolts. Start these bolts but do not tighten them yet.
Install the Rough County spacer between the front of the Long brace and the body of the Crosstrek with the Rough Country supplied hardware.
Torque the Long Brace front and rear bolts according to the specs in the following graphic:
Do this exact same process on the other side.
Next, you’ll need to remove the rear struts so you can install the rear strut spacers on top.
In the ‘trunk’ (hatch?) of the Crosstrek, you need to access the top of the rear struts. These are hidden under the plastic trim pieces under the floor.
Find and remove the bolts from the top of the struts.
Remove the strut from the lower control arm.
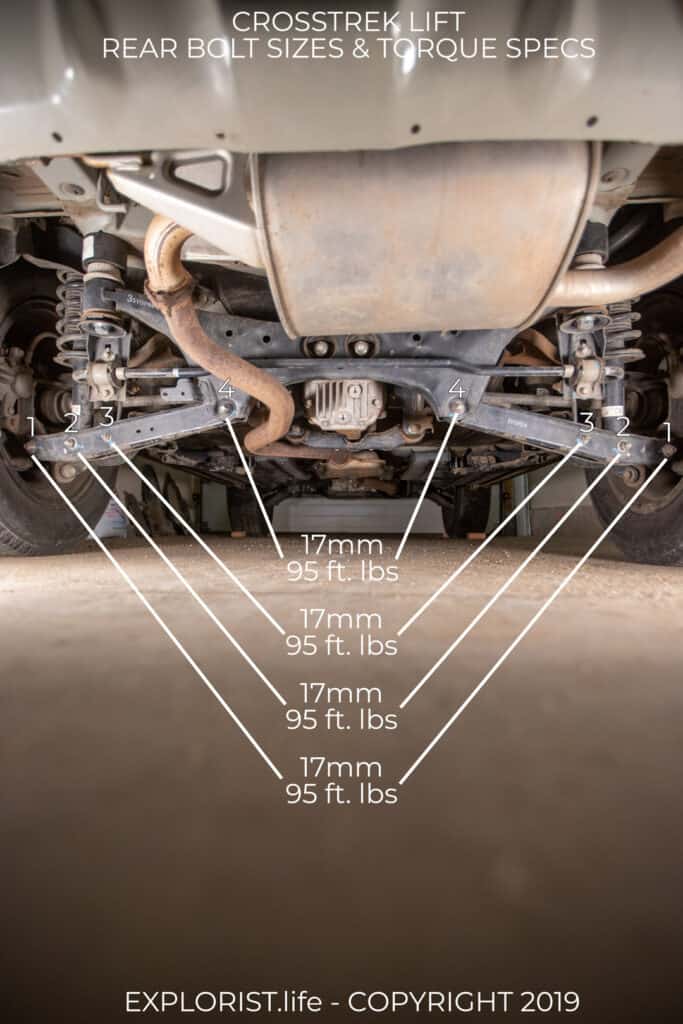
Here are the socket sizes for the bolts/nuts you’ll be removing next.
Working on one side at a time, support the control arm with the floor jack and loosen each of the above-listed bolts and remove bolts 4, 3, and 2 from the control arm and remove the strut.
Press the strut spacer stud onto the rear strut spacer.
Install the strut spacer on top of the strut.
Reinstall the strut back into the factory location.
Reinstall the nuts back onto the top of the struts in the trunk
Reassemble the Rear Control Arms
Reassemble the rear control arms by reinstalling the bolts we removed earlier. Using the following graphic, I found it easiest to reinstall bolt #4 first, then reinstalling bolts #2 and #3.
Tighten these bolts down to barely more than finger tight for now.
Repeat this process on the other side following the exact same steps.
Install the brake line adapter between the strut and the brake line with a 13mm wrench and socket.
Reinstall the wheels, and torque the lug nuts to 90 ft/lbs.
Lower the car, remove the wheel chocks and reattach the negative battery cable.
Roll the car back and forth a dozen times or so to allow the suspension to settle.
Torque the rear control arms to the following specs:
Have an alignment performed in accordance with the alignment specs found on the back of the Rough Country instruction sheet.
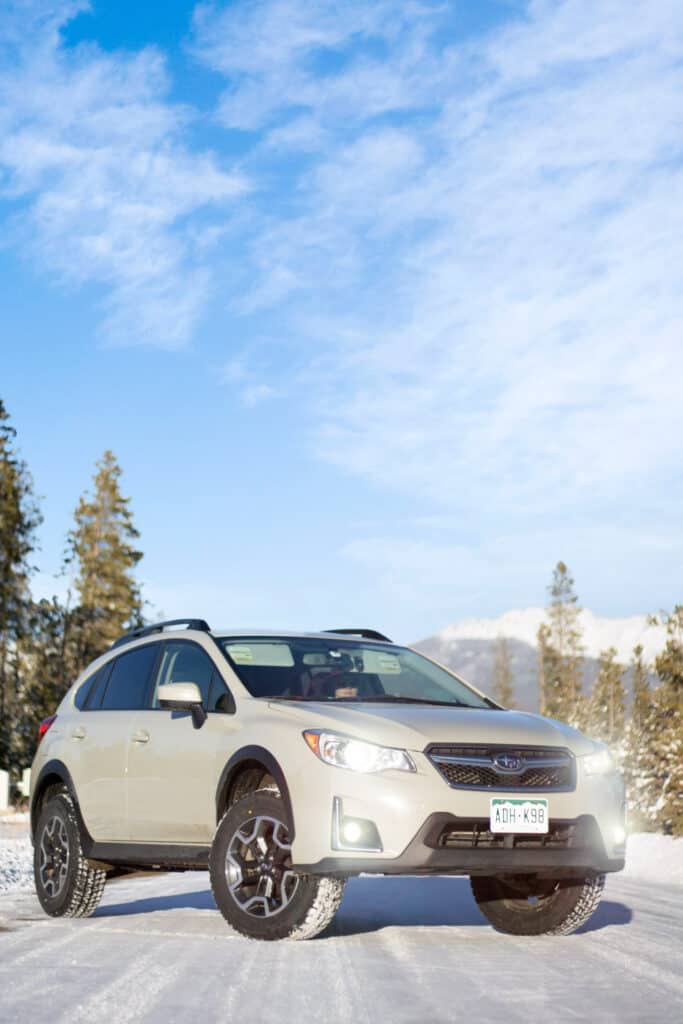
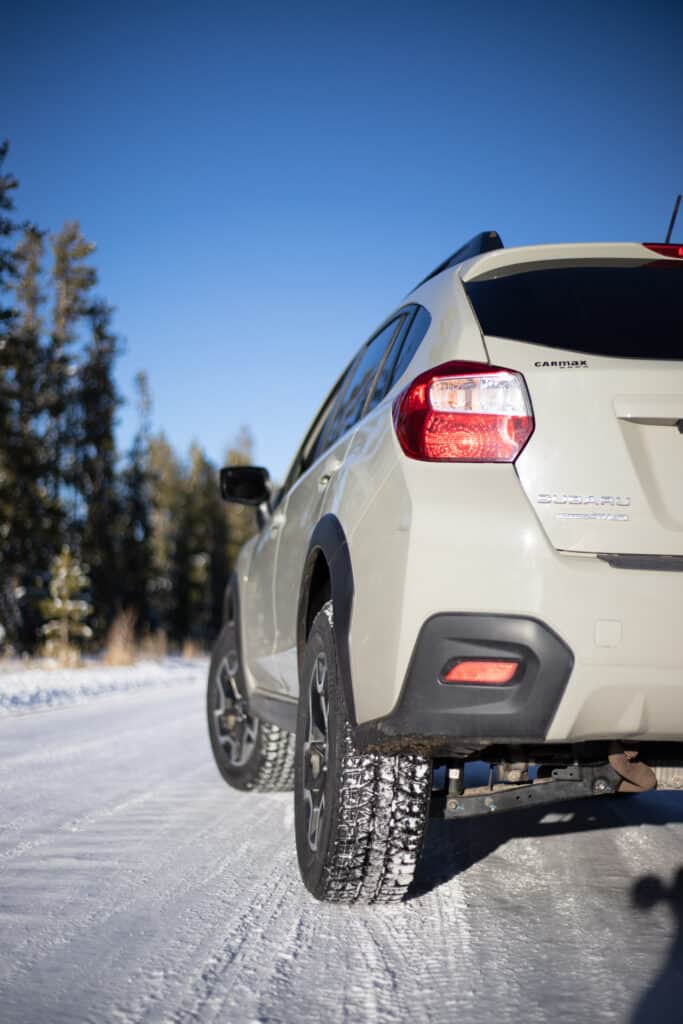
That pretty much wraps up the installation of installing a 2″ Rough Country lift kit onto a 2016 Subaru Crosstrek. I’ve put a few pictures below of the final project after we installed our bigger tires. If you want some more information about the tires we installed and how they fit/where we had to trim, you can check out that blog post here: https://www.explorist.life/subaru-crosstrek-bigger-snow-tire-upgrade/

7 Responses
HI, great you tube video and instructions. I just realized that when lowering the rear sub frame 2 inches it will most likely interfere with the exhaust pipe which is tucked up near it. ANy suggestions from your install?
There were no issues with exhaust interference.
Does the plastic shield that covers the long brace get reinstalled?
Help. Great explanation and video of the install. Like you, I followed the instructions and couldn’t get the strut back on the wheel assembly. I found your video and removed the sway bar bolt and it helped fit the strut in. However, I can’t seem to get the sway bar attached back. I can’t get the bolt back through the hole. What is the truck to that? I put a jack under it to try and jack it closer but no luck.
Hoping you’ll respond soon as I started this late on Saturday night and need to have it done over the weekend. Thanks!
Without being there, it’s REALLY tough to say. Persistence and finesse with the jack is key, though.
I think the torque specs on the rear sway bar links are way off. 95 Ft-lbs on a little bolt like that will strip the threads.
I believe the correct specs are 45 ft-lbs.
Otherwise the instructions were excellent! I had the kit for about 6 months and in the end decided to remove it. Even though the front spacers are offset to preserve the steering geometry, I had to put in a “thinner” camber bolt to get it to align properly, and there was a very noticeable shake while accelerating under load – only in the 15 to 20 mph range.
Thanks for it all, helped tremendously, you were concise and very clear.
So, one thing Brake lines are 12 mm not 13, cheers.
Gene